Visual Studio is one of the most-used IDEs for building products on the Microsoft technology stack. Whether you're building on top of .NET Framework, .NET Core, .NET Standard, or another framework, you are or most likely have at some point used Visual Studio. (This piece will focus on .NET projects, but Visual Studio also supports languages like JavaScript, C, and C++, among others.)
In the Microsoft universe, reusable code comes in the shape of pre-built assemblies (.dlls). When you decide to include these in your project, they are referred to as project dependencies. If your project is small, it might have just a couple of dependencies, but most production-grade software will have lots. This comes with increased complexity in managing these dependencies.
In this post, we will be looking at how to best manage dependencies for your .NET projects using Visual Studio and NuGet (the package manager for .NET), with a peek behind the scenes at what happens when you’re taking related steps in the Visual Studio UI.
RELATED: Managing Dependencies in .NET: .csproj, .packages.config, project.json, and More

Table of Contents
Behind the Scenes in Visual Studio
Alternatives to Visual Studio UI
Additional Tips: Dependency Management in Visual Studio
Project Dependencies in Visual Studio
Let us first have a look at the different types of dependencies you might find in a .NET project.
For the purposes of this article, we will be focusing on .NET Core projects in Visual Studio 2019, but a lot holds true for previous versions dating back to 2017 and also for version 2022.
When you right-click on the “Dependencies” node in your project in Visual Studio, you will be presented with the following list:
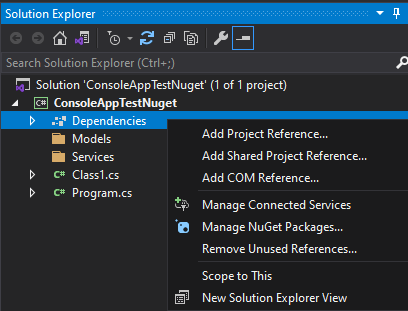
So, what do all these options mean? Let's take a look.
Add Project Reference: Use this if you want to refer to the output of another project located in the same Visual Studio solution (.sln). Visual Studio can figure out what assembly to use given the path to the project. Also called project-to-project reference, this is preferred to referencing files (assemblies) directly because it creates a dependency between projects in the build system, which helps keep the dependency tree consistent.
Add Shared Project Reference: Another way to reuse code is via Shared Projects, which allow you to write code that can then be referenced by other projects. A shared project does not have a binary output; instead, the code is compiled as part of each other project that references it.
Add COM Reference: This allows referencing of COM components.
Browse: The above three options will open the Reference Manager, which allows for a fourth option: “Browse.” Use this if you want to refer to another component from the local file system (or a trusted network location). However, Microsoft recommends using project-to-project reference instead of direct file reference.
Manage Connected Services: Use this if you need to connect your application to external services, like Azure Services, SQL Server databases, or a host of other services which can be installed from the Visual Studio Marketplace.
Manage NuGet Packages: One of the most-used options, and our focus for the remainder of this post, is managing references to NuGet Packages.
NuGet and Visual Studio
As the world became more and more connected through the internet, software developers also became increasingly interconnected and aware of each other’s work. As a side effect, sharing and reusing code between projects went from being desirable, to being the norm, to being a necessity.
But reusing code as assemblies can be a tedious and complex process, especially when dealing with huge projects that have many dependencies. Keeping track of all the required dependencies, making sure they are available in all environments and with the correct version, reconciling versions in the dependency tree, and managing cascading dependencies can be time-consuming and error-prone.
So, the more developers were interested in sharing and reusing code, the more the need for a managed solution for dependency management became apparent.
For the .NET world, this solution came in 2010 when NuGet was first launched. NuGet is the package manager for .NET. It is a software-as-a-service solution that enables developers to create, share, and consume useful code in the form of “packages.”
NuGet was initially distributed as an extension for Visual Studio, but starting with Visual Studio 2012, it became fully integrated into the IDE. It can also be used via its native client (nuget.exe), via MSBuild, or via the .NET Core SDK (dotnet.exe). The latest stable version at the time of writing is 5.11.0, launched in August 2021.
NuGet packages are nothing more than zip files (with the .nupkg extension) that contain the compiled code (.dll files) and other files related to that code including a manifest.
NuGet enables developers to:
- Create packages and publish them to a public or private repository
- Retrieve packages from repositories, add them to their projects, and call that functionality from their code
Let’s dive a little further into using the Package Manager UI in your Visual Studio project to handle package dependencies. We will be using Visual Studio 2019 and NuGet 5.11.0 as references, but most of this holds true even for older versions of Visual Studio and NuGet.
Adding or Removing a NuGet Package
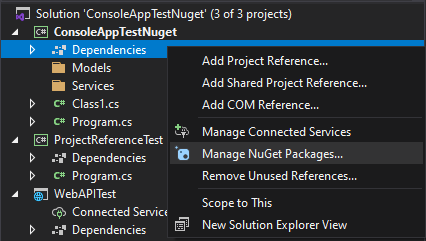
To add a NuGet package to your project, after you right-click on the Dependencies node in your Solution explorer, choose the “Manage NuGet packages…” option:
This will open up the NuGet Package Manager UI, where you are presented with three main areas: Browse, Installed, and Updates; you can also select the Package Source, i.e. the repository where Visual Studio will search for available packages.
Go ahead and select the Browse tab, search for your package, select the desired version of that package, and hit Install.
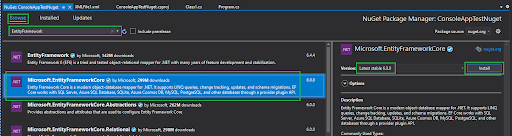
Visual Studio proceeds to install the package and its dependencies into your project. Once the operation is complete, you can start writing code that calls/uses code from the newly added package.
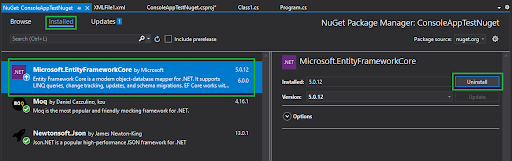
Now, back in the Package Manager UI, switch over to the Installed tab where you should see your new package. You can choose to Uninstall it or any other package that was previously added to your project.
Updating a NuGet Package
If you have installed an earlier version of a package at some point, you might want to update that package to a newer version.
To do that, back in the Package Manager UI, switch over to the Updates tab, where you can see those packages included in your project for which a newer version is available in the selected repository, in our case nuget.org.
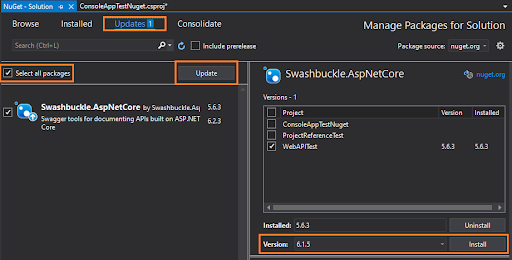
Here, you can choose to:
- Select one or more of the packages in the list and hit Update. This will upgrade all the (selected) packages to their latest version.
- Select one of the packages, then on the right-hand side choose a specific version that you want to upgrade that package to and hit Install. This will upgrade only the selected package to the particular version that you selected.
Behind the Scenes in Visual Studio
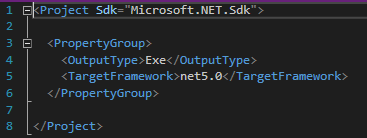
A Visual Studio project is defined by a .csproj file, which is an XML file that holds different configuration settings for the project.
The information about the NuGet package dependencies for your project is stored in this .csproj file.
NOTE: For .NET Framework projects and more generally for non-SDK-style projects, the package dependencies are by default stored separately in a packages.config file in a similar fashion and with a similar dynamic.
Here is a sample of a .csproj for a new .NET Core Console Application:
Adding a Package
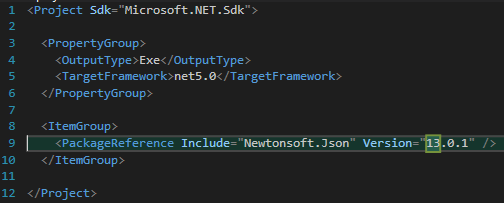
When you add a new package to the project, Visual Studio will:
- Download the package
- Unpack and install it in a dedicated folder on your local machine
- And finally, add a corresponding PackageReference node in the .csproj file:

NOTE: Adding a package via the NuGet CLI will not update the .csproj file. To achieve that, use one of these approaches:
- VS Package Manager UI
- VS Package Manager console
- Dotnet CLI
Updating a Package
When you update a package in your project, behind the scenes Visual Studio will:
- Download the specific/latest version of the package
- Unpack and install it in a local folder
- Modify the corresponding node in the .csproj file
Uninstalling a Package
When you uninstall a package from your project, the corresponding PackageReference node will be removed from the .csproj file.
NOTE: These actions can also be achieved by editing the .csproj file directly, but make sure you know what you are doing as this can generate inconsistencies and corrupt the .csproj file.
For more options offered by the PackageReference structure, you can reference Microsoft's documentation.
Restoring Packages
The advantage of using NuGet is that your project is self-sufficient even without the actual installed packages (i.e. the .dlls). As long as the package dependencies are correctly described in the .csproj file (or the packages.config file), you can clone/copy your project code to another machine and get it to build and run in no time.
This can be achieved by doing a Package Restore operation. Package Restore will attempt to install all the package dependencies exactly as they are defined in your .csproj file. It will start by installing the direct dependencies of your project, and then move on to dependencies of dependencies, and so on, until the full dependency graph is covered.
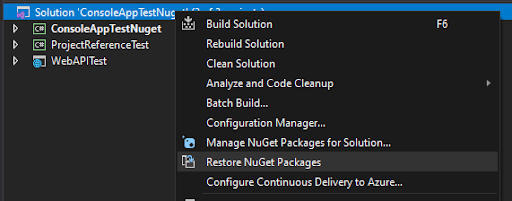
There are two ways to perform a Package Restore operation from Visual Studio:
- Build Project/Build Solution will automatically perform a package restore
- Right-click on Solution and select Restore NuGet Packages
For more ways to restore packages and other related details, you can reference Microsoft's documentation.
One scenario where the restore capability is extremely useful is the case of an automated CI/CD pipeline. The pipeline does not need to care about storing the actual binary files of the package dependencies. All it needs to do to deploy a new environment is:
- Spin-up the actual host environment
- Clone the repository locally on the host environment
- Build the project or restore packages explicitly
Alternatives to Visual Studio UI
Along with the Visual Studio UI, here are some other ways to manipulate packages in your project.
Package Manager Console
You can reach this via Tools -> NuGet Package Manager -> Package Manager Console.
In the console, you can use commands to:
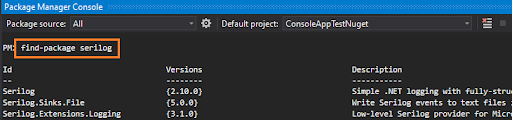
- Find the desired package:
Find-Package [package_name]
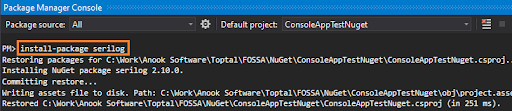
- Install it:
Install-Package [package_name]
- Uninstall it:
Uninstall-Package [package_name]

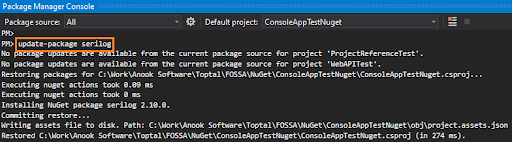
- Update it:
Update-Package [package_name]
For more details about these commands and the console in general, see the documentation.
Dotnet CLI
The dotnet command-line tool can be used for .NET Core, .NET Standard, or any SDK-style project.
You can use it by opening a command line, switching to your project’s folder, and typing different commands to:
- Install a package:
dotnet add package [package_name] - Uninstall a package:
dotnet remove package [package_name] - Update a package:
dotnet add package [package_name]without specifying the [-v] option will install the latest version - List all package references for your project:
dotnet list package - Restore packages:
dotnet restoreand alsodotnet buildordotnet runstarting with .NET Core 2.0.
For more details about using the dotnet CLI, see the official documentation.
NuGet CLI
The NuGet command-line tool can be used for .NET Framework or any non-SDK-style projects that still use the packages.config file to store the description of the package dependencies.
As a prerequisite, nuget.exe CLI needs to be downloaded from nuget.org and stored in a local folder that is added to the PATH environment variable.
You can use it by opening a command line, switching to your project’s folder, and typing different commands to:
- Install a package:
nuget install <packageID> -OutputDirectory packages - Install with a specific version:
nuget install <packageID | configFilePath> -Version <version> - Remove a package: For this, simply delete the package from the
packagesfolder - List all package references for your project:
nuget list -Source <source> - Restore packages:
nuget restore MySolution.sln
For more details about NuGet CLI, see the documentation.
Additional Tips: Managing Dependencies in Visual Studio
Reinstalling a Package
There are several situations where it might be useful to reinstall a package, such as:
- Broken reference after package restore
- Corrupted project due to deleted files
- Broken project after package update
- Retargeting or upgrading a project
- During package development
If you find yourself in one of these situations, use one of the following ways to reinstall the package:
- Package Manager Console: Run the
Update-Package -reinstallcommand - Package Manager UI: Go to Installed tab, hit Uninstall, then go to Browse tab, search for the package name, select it, and hit Install.
- Dotnet CLI: Run the
dotnet restorecommand - NuGet CLI: Delete the package folder and then run the
nuget install <id>command
Consolidate
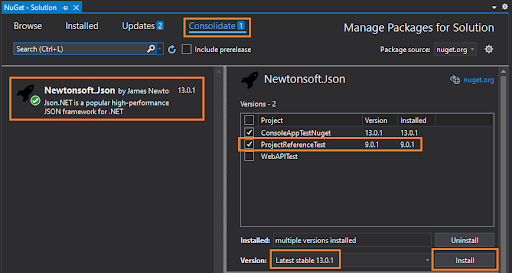
Using different versions of the same package in different projects within a solution is considered a bad practice. To check and solve this for your solution, go to Manage Packages for Solution and you will be presented with a fourth tab: Consolidate.
Here, you can see a list of packages for which different versions are used throughout the solution. To solve the issue, simply select the projects you want to update, select the version you want to use in all of them, and then hit the Install button.
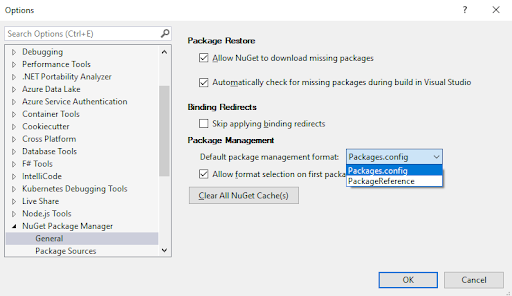
Packages.config
Some projects use a file called packages.config to record the package dependencies. This is an alternative to having that information stored in the .csproj file in the PackageReference nodes. The NuGet CLI uses the packages.config file as reference.
Visual Studio allows you to select either packages.config or PackagesReference to use as the default support for package management. You can set this up by going to Tools -> Options -> NuGet Package Manager settings:
Migrate from packages.config to PackageReference
There are some advantages to using PackageReference and .csproj instead of the packages.config file for storing package dependency information:
- All project dependencies are managed in one place: There’s no need for a secondary file (i.e. packages.config)
- Simple view of only top-level dependencies: .csproj only lists the direct dependencies as opposed to packages.config, which lists all dependencies.
- Performance improvements in managing and using dependencies: In the PackageReference approach, the packages themselves are maintained in a folder structure outside of your solution
- Multiple options on PackageReference nodes that allow more refined control over dependencies
To migrate your project from the packages.config setup to PackageReferences, simply right-click on the References node in your Solution Explorer and select Migrate packages.config to PackageReference.
See the documentation for more details about this operation.
Managing Dependencies in Visual Studio: The Bottom Line
Third-party code is an essential part of software development for essentially every organization. However, using it can create challenges with dependency management, especially for larger projects.
Fortunately, package managers have been invented — multiple options exist for different development environments and frameworks.
For the .NET ecosystem, NuGet is the solution to package management that can simplify and abstract away most of that complexity. Hopefully this article has encouraged you to start using NuGet or has taught you something new about NuGet if you were already using it.
Happy coding!
About the Author
Cristian Taran is a seasoned full-stack software engineer who specializes in the Microsoft tech stack. His recent weapons of choice include React JS, Python, .NET Core, and MS SQL Server. Whether he is coding, working out, or playing video games, he prefers doing it to the sound of music.